What to Know:
- Viewing chats while VR gaming can enhance the experience
- Use multiple software options to help integrate your Twitch chat
- Consider setting your chat size to 1920 x 1080
In This Article:
- Growth of the Gaming Industry
- Types of Overlays
- Why Use a Chat Overlay?
- YouTube Tutorial
- Methods for Adding Chat Overlay
- Ovrdrop
- LIV StreamerKit
- PSVR
- PC Oculus
- Best Overlay Practices
The undeniable growth of the video game industry has led to more innovation in recent years. More and more video game streaming platforms have emerged, and it’s estimated that a total of 8.8 billion hours of video game live streams were viewed in 2021.
Platforms such as Activision Blizzard, Twitch, HUYA and YouTube have garnered much attention — they’re a staple in the video game industry.
Additionally, virtual reality (VR) technology has improved the gaming experience for all types of gamers. Combining live streams with VR makes for an immersive, unforgettable gaming session.
As virtual reality (VR) becomes more popular in the gaming industry, streamers are playing VR games like “Half-Life: Alyx” and many others. However, as a streamer, you may still want to see the chat as you play. To do so, you need to know how to set up Twitch chat overlay in VR.
While Twitch hasn’t come up with an integration yet, you can use extensions instead. The best way to see Twitch chat in VR is by using the OVRdrop and SteamVR downloads. It’s compatible with Oculus Rift and Rift S, HTC Vive Valve Index. PlayStation VR and PCs have their own methods for a Twitch chat overlay VR setup as well. Below is our step-by-step process on how to set up twitch chat overlay in VR.
Types of Overlays
Aside from just Twitch chat in VR, there are other types of customized overlays you can add using these tools. You can get as creative as you want with overlays, whether you want to design a custom branded logo or a border that surrounds the perimeter of your stream.
Whatever overlay you choose, they’re meant to enhance the appearance of your stream and the goal is to garner more views while playing. There are plenty of online resources to help give you some inspiration.
Here are the basic types of overlays you can integrate into your stream:
- Webcam Overlays: An overlay around the camera widget to make viewing more appealing
- Stream Chat: A chat overlay that allows you and your viewers to monitor the stream chat mid-game
- Ad Overlay: An image or banner that shows your sponsor’s brand
- Stream Alert: An overlay that includes cheers, a new subscriber or donation alerts
We’re going to focus on creating stream chat overlays to improve your gaming experience.
Why Use a Chat Overlay?
There’s no denying that trying to toggle between a streamer’s live stream and chat can be challenging. It’s a bit of a cumbersome process and takes away from the viewer’s experience.
By incorporating a chat overlay, you’re immediately able to chat live with those watching your streams. It’s also a perfect way to draw more viewers and expand your audience reach.
When viewers see a live chat, they’re also provided with a sense of community. The goal is to capitalize on that sense of community and encourage open discussions while you play.
How to Stream VR on Twitch
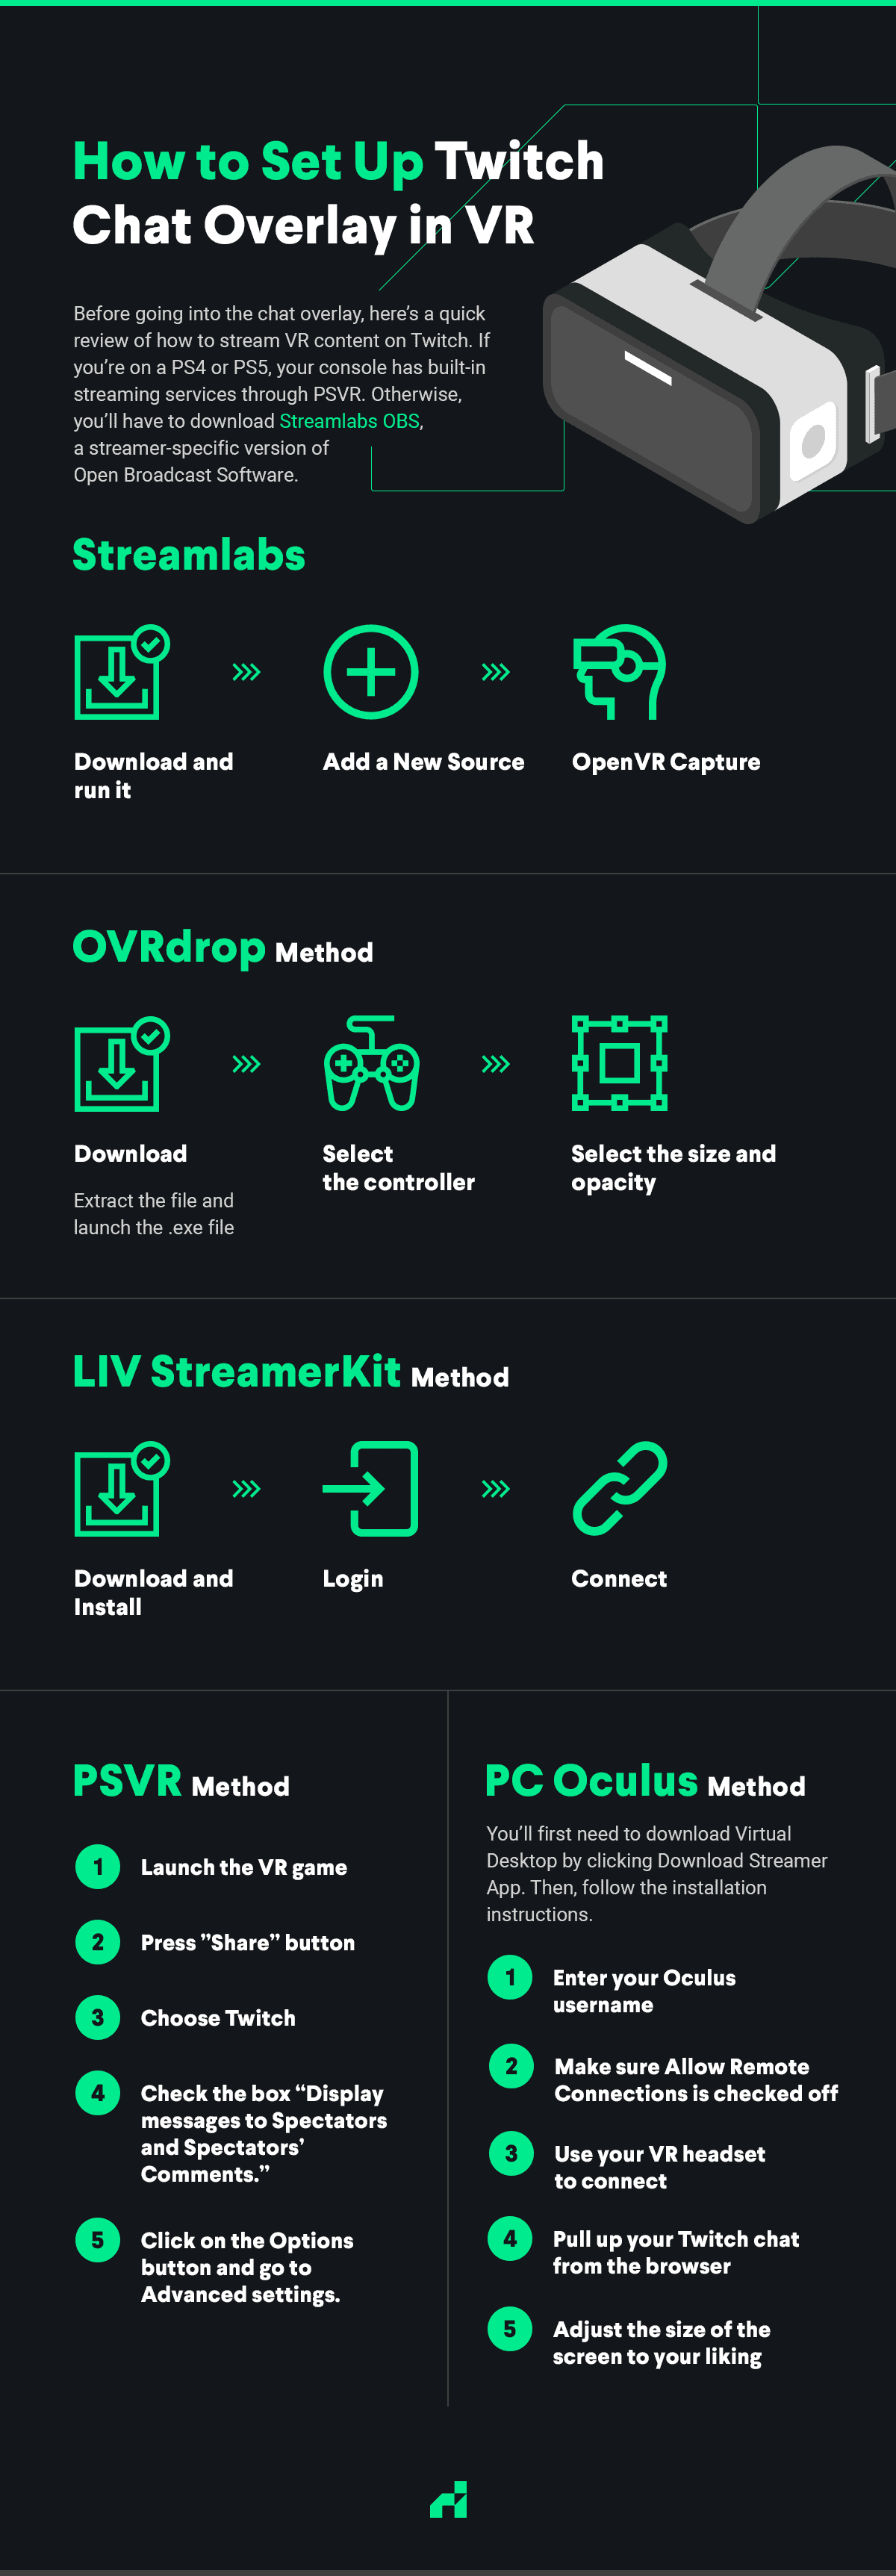
Before going into the chat overlay, here’s a quick review of how to stream VR content on Twitch. If you’re on a PS4 or PS5, your console has built-in streaming services through PSVR. Otherwise, you’ll have to download Streamlabs OBS, a streamer-specific version of Open Broadcast Software.
After downloading Streamlabs OBS, run it and click the “Add a New Source” button, which looks like a small plus sign. From there, click “OpenVR Capture.” This will take you to a menu where you can set your cropping to your preferences. Your VR headset should come with instructions for ideal crop and resolution settings.
After that, you’ll see “OpenVR Capture” as an option when you run Streamlabs OBS. Whenever you want to stream in VR, boot up your game, click that as a source and start streaming.
Refer to YouTube
You may want to consider watching useful tutorials on YouTube to assist with the process of adding Twitch chat overlay to your VR streams. Here’s one that takes you through some of the different methods. Seeing this process unfold visually may be easier to understand!
How to See Twitch Chat in VR
The best four methods to see Twitch chat overlay in VR are the OVRdrop method, the LIV StreamerKit method, the PSVR method, and the PC Oculus method.
OVRdrop Method
Conveniently, many VR headsets are compatible with the OVRdrop method. Here’s how to set up Twitch chat overlay:
First and foremost, a few versions of OVRdrop exist. On Steam, you can get OVRdrop for $12, which comes with 1440p graphics capabilities. Another option is OVR Toolkit for $12 on Steam as well. You can decide which one fits your needs best.
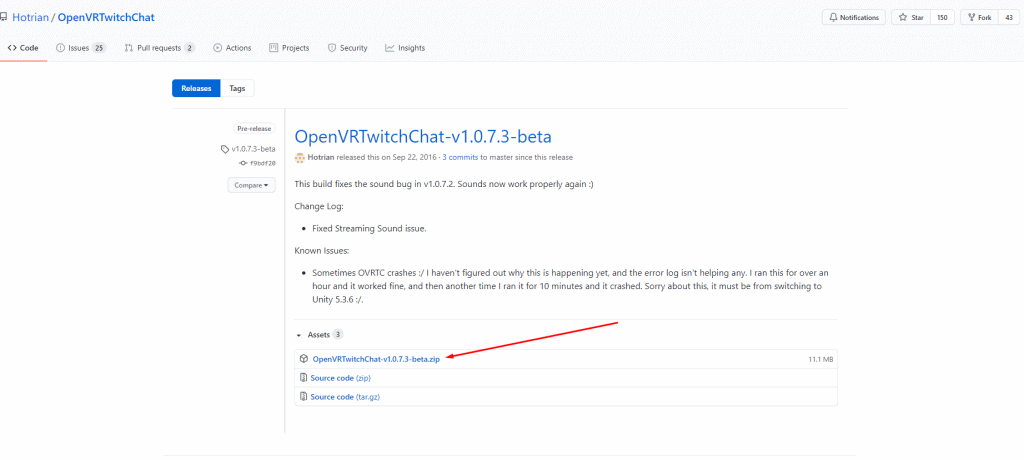
For the free version of OVRdrop, which has a max resolution of 360p, download the extension from Hotrian on Github. It’s the first link under “Assets.”
It says “OpenVRTwitchChat-v1.0.7.3-beta.zip”. Click on it to download the file. Once it downloads, be sure to create a new folder for it in a convenient place — you’ll need to run it before every VR stream you do.
Extract the file and launch the .exe file afterward. It will bring you to a screen where you need to enter some information — your username, the OAuth key and your channel name. You may only need to enter the channel name.
Select the controller you want to use by going to the drop-down menu in the bottom left that says “World.” Select one of your controllers to use.
Then, select the size and opacity of your chat so you can clearly read it. Go to the menu in the bottom right that says “None.” You’ll have to play around with entering numbers to get the settings to your liking.
Check to make sure it all works. Use the chat while you play to see if it integrates properly. You should see it on your screen while you’re gaming.
LIV StreamerKit Method
A similar way to set up a Twitch chat VR overlay is with LIV StreamerKit. LIV is a mixed reality software with a range of features, but you can also use it just to see the Twitch chat in VR.
Like with OVRdrop, you first need to download LIV on Steam, where it’s available for free. You’ll also need to install SteamVR and run it at least once before using LIV. Apart from that, all you need is a PC-compatible VR kit like the HTC Vive.
After running SteamVR, open LIV, click the “About” button, then click “Install.” In LIV, you should also see a button to launch StreamerKit, which is the service you’ll use to set up the Twitch chat VR overlay. Click that, then under “Twitch,” click “Login.” From there, you can read and accept all the permissions you need to enable to connect it to your Twitch account.
Repeat this permission process under the “StreamLabs” and “StreamElements” tabs, then restart SteamVR. From there, every time you want to see the Twitch chat in VR, just open StreamerKit and click “Connect.”
In the StreamerKit settings, you can adjust settings like the overlay size, location and opacity. You can even choose whether to attach the chat to one of your controllers or for it to follow your head movement.
While LIV is free, it doesn’t support as many headsets as OVRdrop and may be more complicated to use. If you want to use it to see the Twitch chat in VR with an Oculus Quest, you’ll have to also use the PC Oculus method below.
PSVR Method
Just as Twitch streaming has grown popular — even reaching the level of providing income for many streamers — so have PlayStation consoles. Luckily, the PlayStation 4 has an easier way to integrate a Twitch chat overlay VR setup while you play on your PSVR.
Your console and VR headset must be up-to-date with the latest software first and foremost. Then, on your PS4, follow these steps:
- Launch the VR game you plan to stream on Twitch.
- You should have a Share button option from your PSVR controllers. Click on it. Then, you’ll see the devices and platforms you can integrate.
- Choose Twitch.
- Go on to the next screen and you should see an option in the top right to “Display messages to Spectators and Spectators’ Comments.” Check the box to turn it on. You can also “Include Microphone Audio in Broadcasts” by checking that box, too.
- Click on the Options button and go to Advanced settings. Select which settings you’d like to turn on during your streams.
Keep in mind that if you’re playing with a capture card — which allows you to play in fullscreen when you want to take pictures or record the game — you won’t be able to see the chat. The fisheye mode is the only view that allows the Twitch chat to appear for PSVR.
Then, you’re ready to start playing your VR game while still seeing your Twitch chat. While we’re still waiting on the new PS5 update for PSVR, the PS5 is backward compatible with PS4 VR games. Until the new version of PSVR releases, the process will be the same between the two consoles.
PC Oculus Method
If you’re wondering how to see Twitch chat in VR with the Oculus Quest, you can use the PC method. This method involves using Virtual Desktop, which is a program that lets you access a computer from another platform. This setup allows you to get VR chat overlays with Oculus headsets.
You’ll first need to download Virtual Desktop by clicking Download Streamer App. Then, follow the installation instructions.
- It will prompt you to enter your Oculus username, which connects Virtual Desktop to your headset.
- Make sure Allow Remote Connections is checked off on the side of where you enter your username. You can check off other preferences there to your liking as well.
- Use your VR headset to connect and then interact with your desktop through your VR controllers.
- Pull up your Twitch chat from the browser.
- Adjust the size of the screen to your liking.
Then, you should be able to use the built-in feature of Oculus SDK for Windows, which lets you better customize your VR experience. For instance, you can pin windows like your Twitch chat. You can also download the latest version if needed.
Keep in mind that this method and the OVRdrop method are the only two that will work for Quest VR headsets. Quest headsets do not have a built-in function for a Twitch chat overlay VR setup. Instead, you’ll need to use either a PC or the OVR Toolkit to view your chat while you stream.
Best Overlay Practices
While playing around with different overlays can be a fun and exciting process, the last thing you want for your stream is to be cluttered with graphics. Here are some best practices to follow when creating overlays:
- Aim to set opacity to 75% to keep the game you’re playing more visible
- Match colors and themes together as to not distract your audience
- Factor in your camera setup and if you prefer a rectangle or square frame
- Aim to create overlays you think your audience will appreciate during viewing
It’s also key to remember the sizing of your overlays. It’s recommended that overlays should be 1920 X 1080 pixels and stream alerts should be 750 X 250 pixels.
A Better Twitch Chat Experience
With these steps on how to set up Twitch chat overlay, you can use any virtual reality headset you have to get the optimal Twitch chat VR setup. Communicate with viewers easier while never breaking your focus. Now, you’re ready to start playing!
Recent Stories
Follow Us On
Get the latest tech stories and news in seconds!
Sign up for our newsletter below to receive updates about technology trends


")
 (2)")